Pages

Monday, July 30, 2012

Maine Quilts 2012- Part 2


This is the second half of the Chapter Challenge quilts- "Triangles of Friendship."
Nancy's Blooming Lupines 

Cheri's Peeling Oranges 

Ella's Church Window 

Kim's Friendship Tree of Life 

Hannah's Mr. Emma 

Sharyn's Friendship Baskets 

Next time I'll post the judged division quilts from the members of our chapter.

Til next time,
Mary

Saturday, July 28, 2012

Maine Quilts 2012- Part 1

Maine Quilts 2012 opened Friday. This show is made possible by the efforts of volunteers, to each and every one, THANK YOU!  As usual, the quilts were beautiful, very well stitched and quilted. I am always in awe of the talents of our all quilters. Today, I will share some of our Chapter's Challenge quilts, with the remainder shared tomorrow. The challenge was "Triangles of Friendship" inspired by Edyta Sitar's Friendship Triangles. We were to combine batiks and regular cottons, using at least four each of a tangerine  and a neutral batik in half-square triangles. 

Eileen's Illumination Gone to pieces

Heather's Falling Leaves

Anita's Batik Medallion 

Virginia's Aussie Palms 

Wes's Springtime Beauties 

Nina's Too Many Triangles 

Sally's Arbe de Vie 
I hope you have enjoyed the quilts.
Til next time,
Mary

Friday, July 20, 2012

Two Projects Finished

After all the traveling and building, I finally pick up some fabric to complete a couple of projects. First are a set of hot pads. The blocks are from Eleanor Burns Day & Night. I made a pillow runner for my Mom and these were the left over pieces. These are thick, very thick hot pads which make great gifts.


Hot Pad “Filling”
Materials:
  Lots of scrap strips of varying widths(1/2" to 1 1/2") and lengths.
  Foundation approximately 1” larger than your desired finished size. It can be any cotton fabric.

1. Place one strip at the right edge of the foundation.
2. Lay the second strip so that it overlaps the first and stitch the length of the strip. You can use a straight or zig zag stitch.
3. Lay the third strip so that it overlaps the second and stitch.
4. Continue adding strips until you have covered the entire foundation.
5. Rotate the block and add strips just as you in Steps 1-4 until the entire square is covered.
6. Repeat two more times. You will have 4 layers plus the foundation( 5 total). This is your hot pad “filling”. DO NOT trim. When you have completed your hot pad “crusts”, you will trim to size.


Hot Pad “Crusts”
You will need 2 “crusts” for each hot pad, which can be made from any block pattern. If you have orphan blocks this is a great way to use them.
1. Take each of your blocks and quilt it to 1 layer of batting. The batting should 100% cotton or 80-20 cotton/poly, but NOT 100% polyester, as it could melt. Threads used should also be 100 % cotton.
2. When you have finished quilting, trim your “filling” and “crusts” to the desired size.
3. Layer crust right side down, filling, crust right side up. Baste together the edges of the three layers. The layers of the hot pad will be held together with the binding. 
4. Finish using your favorite binding method.


The second project finished was Strip Twist from Bonnie Hunter at Quiltville. I love making scrap quilts and her patterns are a lot of fun. I really like taking fabric that might be considered "trash" worthy and turning it into something useful. If it's beautiful as well, all the better.
I tried to make the quilting in the inner border look like a braid. The corners presented a challenge, but overall I am satisfied. Each Half-Square of each block had feathers as seen here. The outer border had piano key quilting.

Til next time,
Mary

Monday, July 16, 2012

Cushions for the benches

Now that the benches are built and painted, it's time to make the cushions. An excursion to Joann's with Wes yesterday resulted in this fabric( along with several other items) coming home with me. The white works well with the new white benches, the blue compliments the carpet, brown to add some contrast, and a very pale sea foam green that I'd like to paint the walls. Perfect!
First I cut the top and bottom panels to size, then it was time to make the welting. This required 9 1/2 yards of bias strips cut 2 inches wide and sewn together on a 45 degree angle. This welting foot is very helpful in making the welting. It has a channel that rides over the cording and the needle stitches up close.


 I stitched the cording into the bias. Then trimmed the seam allowance to 1/2.


I pinned the welting to the top to determine the exact length needed, and joined the ends in the same manner as I do for binding. Returning to the sewing machine with the welting foot, I sewed the welting to the top and bottom panels.


When I came to corners, I made four clips just shy of the stitching line. Pinning each little tab keeps the fabric flat and in place. 
After the welting was sewn on, I attached the sides to complete the cushion.


The finished cushion showing the welting. It fits very nicely and brightens up the area.


This is the corner of my quilting studio which I have been redoing.
The design wall is complete.
All my quilt books are stored in the benches.
The only thing left to do is sew the second cushion, and I will be ready to resume my quilt making.

Til next time,
Mary

Sunday, July 15, 2012

Scrap Builder Part 2


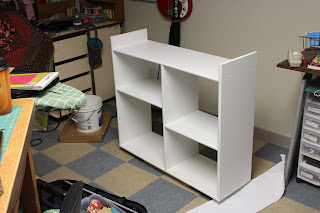
This is the beginning of the second bench/bookcase. The structure in the front will be the base. It is constructed from recycled 2x4's brought from NJ. The structure in the rear is the bench/bookcase. It is constructed from recycled particle board shelving. Actually, it is a composite made from wheat. I tried to find more of it, but apparently they aren't making it any more.
This is the dry fit of the bench. I wanted it to span the entire distance between the Accuquilt cabinet on the left and the TV stand on the right, but I didn't have any boards long enough. I pieced the bottom and left the space on the left to place a rectangular trash bin.
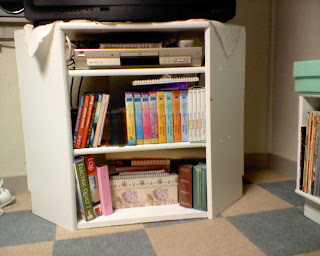
This is a close up view of the TV stand which I built around 1998 for my oldest son's room. I constructed it from MDF and shelving, but never painted it. Now all four units will be a nice clean white.

This is the view showing the two benches and TV stand. Above the right bench is my new design wall. It is made from 1 inch 4' x 6' rigid foam insulation covered with Warm & Natural batting. I used basting spray to adhere it to the foam. The frame is 2" x 2" deck balusters painted white. Once the benches are painted, then I'll make covers for the cushions.

Til next time,
Mary

Tuesday, July 3, 2012

Primitive Gatherings

While in Wisconsin, I had the opportunity to visit the Primitive Gathering Quilt Shop near Osh Kosh. 

This is the shop owned by Lisa Bongean who designs the patterns by the same name.
If you like wool applique, this is the candy store for you! The shelves are filled with every imaginable color of hand dyed felted wool. I selected several pieces and tried to think of a project in which I could use them. I tried, really I did. No use, I decided to return them to the shelf and let them live at the store. The positive side is that they have an online store that I can shop at any time.

Til next time,
Mary


Monday, July 2, 2012

The Scrap Builder


My Dad was a carpenter, a very good one. He could take scrap wood from any source and turn it into a beautiful piece of furniture: old oak flooring into a toy chest; a mahogany floor box from a boat into a hexagon side table; a door and kitchen drawers into a much loved desk. I guess I've inherited a bit of his love of scraps, only I do it with fabric. But sometimes, I too do it with wood products.

For Christmas, DH bought me an Accuquilt Go! cutter and some dies. I haven't used it much because there wasn't a dedicated work surface, and it was stored where I couldn't see it. I decided to rectify this dilemma. I sketched some rough plans with measurements.

Out came the particle board shelving. The source, dismantled shelf units from our home in NJ. I've been storing them in the closet for some unknown project. See the scrap fabric analogy? Next, I pulled scrap 2x4's from under the porch (also brought from the NJ house), and I was ready to go. Prime the pieces, cut to length, drill some pilot holes, and
Voila! an Accuquilt cabinet. Well, not really. You know the saying measure twice, cut once? I still have trouble with that one. Next, install the top and secure it to the wall.
The top shelf holds the long strip cutting dies, and smaller dies are stored in a mail holder/sorter. 
Pull out the cutter, set it open on the top, and I'm ready to GO!
Til next time,
Mary

Sunday, July 1, 2012

The Last Leg


The final leg of our trip home began in Erie, Pennsylvania.  A short hop and we were in New York heading towards Buffalo, then Albany , and on to Massachussetts. Trees everywhere I look. Everything was sailing along smootly until a 27 mile traffic back up on 495 delayed our entry into Maine by 1 ½ hours.  DH put me behind the wheel, as I don’t mind the slow moving traffic and it gave him a much needed rest.

Exit 7 in NH means one thing,  the Piscatagua River Bridge is just around the bend.That tells me home is near.

Each time I return to Maine, I do a little cheer, “MAY…NE”, waving my hands as I pass
under the sign. Not long to go. Yeah!

Isn’t this beautiful? Sunset over the Western Maine Mountains. A perfect end to a long
days journey.
It is good to be home.

Til next time,
Mary